How to compress all assets in your Webflow CMS
Uncompressed images can negatively impact the time it takes for your site to load, especially on your blog and other pages linked to your CMS collections.
In order to make your pages lighter and load faster, you can easily compress all the assets in your Webflow CMS collections in a few clicks.
1. Head to your CMS
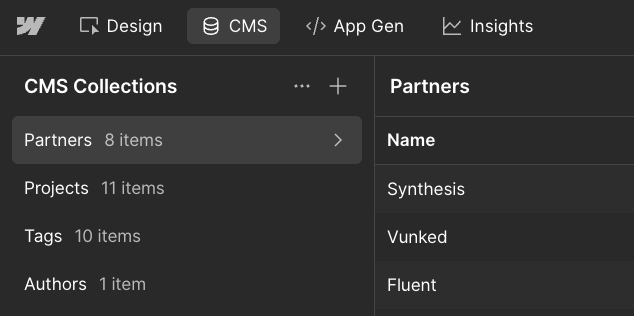
Open your Webflow project in the Designer mode, and head to your CMS tab in the top left.

2. Click the small options button
Once the CMS is open and you can see all your collections on the left, there will be two small buttons: an options button and plus button (to create a new collection). They're fairly small, and so a lot of people easily miss them. Click the options button to see more options for your CMS.
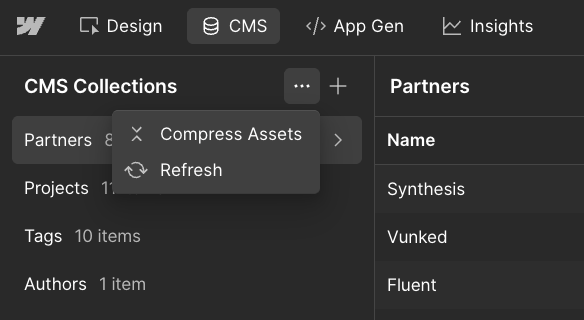
3. Click 'Compress Assets'
Under the dropdown menu, you'll see two options: 'Compress Assets' and 'Refresh'. Click the option to compress assets.
4. Choose your preferred format
Choosing to compress your assets will open a modal allowing you to select your preferred compression format. There are two options, WebP and AVIF.

WebP vs AVIF
Both are decent compression formats, but typically you get smaller file sizes and better image quality with AVIF files rather than WebP files, which is why it's the recommended option. AVIF files tend to be between 20-50% smaller than WebP files, while maintaining a better image quality (WebP has been known to "smear" finer details and create a banding effect on gradients).
WebP and AVIF are - as of today - well supported in most modern browsers. WebP used to be more compatible, but most browsers now also support AVIF fully, too.
The only thing WebP is slightly more performant at is compression speeds. If your CMS has 1000s of images to convert, WebP might be the faster format, but AVIF will be able to handle it too, you might just have to wait a few minutes longer.
We recommend using AVIF.
5. Compress
Once you've selected your preferred format and hit compress, Webflow will handle compressing all the assets in your CMS automatically. This includes things like pictures in blog posts, author profile photos and thumbnail images.
When not to automatically compress
If you're using OpenGraph images for your site's metadata, some social apps still only support PNG file formats for link previews. If you compress all your assets, unfortunately Webflow will automatically compress things like thumbnail images too, meaning you may not see an image in your site's link previews anymore for CMS-driven pages.
You can always add them back after, but this might be a long-winded process.
If you'd prefer to compress as you go, you could use online image compression tools, which allow you to pick a target format and then upload the compressed image into Webflow. That way you can use optimised images in your blog posts, and PNG images in thumbnails/OpenGraph images.